Birth of The Magnetron 2880 by Bennett Cerf

So, I was working for my friend Jason Tippet on a commercial for Nordstrom recently and he told me that the client was expecting a shot in the piece that included a birds eye shot looking straight down that would pull away above kids on a football field at a high school. I had done some drone work for this company in the past so we all thought we'd go in that direction first, but we quickly realized that the drone might not be the safest idea if we were to start just feet above the kids' heads and furthermore might blow their hair around revealing that we were shooting from a weed wacker in the air. So, I told Jason that maybe a technocrane was the way to go for this. When I used to work as a camera assistant, this was the go-to solution for any kind of shot like this. I was completely off on my assumption of the price. I believe the first quotes came in at $5000 for the day. For other things you can spend $5000 on, go here

A technocrane was looking a little hefty just to get this one overhead shot for the commercial so I thought maybe it was high time that I try making a rope-cam with my gimbal. The night before the shoot, I went to REI and after a 30 minute lesson on rope strength and climbing tips, I built my rope cam in my garage. We used it the next day and to my surprise, it worked like a charm. The gimbal stabilized the majority of the shake of the rope being pulled up and I was able to remotely control a spin as we went! I've seen people do rope-cams since the introduction of the handheld gimbal, but finally getting to make one myself, I was suddenly re-invigorated by my gimbal again. So we tried to make another rope cam for the later part of the shoot and i realized I couldn't do something that I wanted to do, separate from the rope. I hadn't thought about it much until I was talking to someone about camera rigging one day and another friend of mine had mentioned that he had heard someone had made an electromagnet coupler. I thought, "that's genius!"

***One of the most important things to me in cinematography is finding the right perspective to describe an idea or an emotion. When I operate the camera, the most important part is that I can adjust nearly every aspect of the camera myself if I need to. This includes being able to grab the camera off a jib arm or a rope with full control over the moment the camera transitions.***

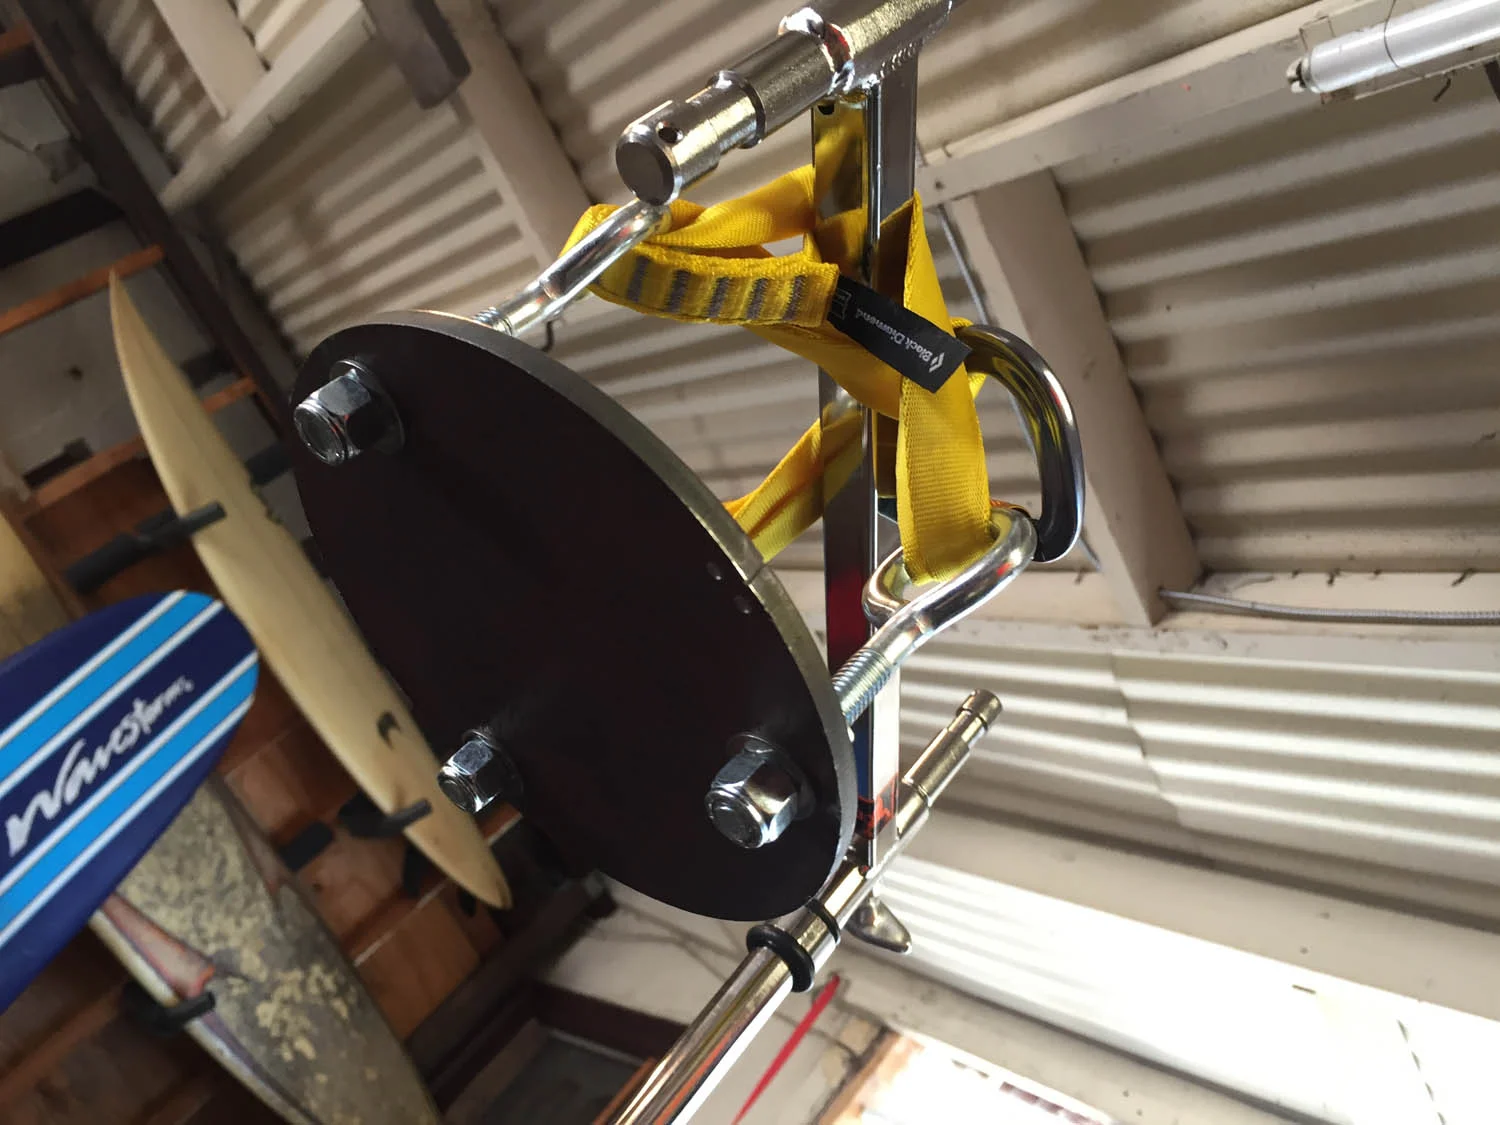
My First Rope Cam. Notice how the camera stays rock solid while the guide lines and pull rope move around.

So, I decided to fish around to see who would want to help make one with me. For the most part, I don't think a lot of people had the time to make it with me, but I told my friend Jeremy at DJI and he said they could use it in there cine gear Ronin MX demonstration. I had a pretty good idea of how to make one, but there were still some vague thoughts on the machining that I didn't know how to accomplish. So, I called up Alessandro di Leo at Ready Rig to see if he wanted to help and he enthusiastically jumped in with so many great ideas. We spoke for about an hour on the phone while I came up with the crude sketch you saw at the beginning of the article in Omnigraffle.

Between Alessandro and I, we ran around buying electronics, wires, hardware and climbing gear to get this project done within a week. 

Below is a video of how the Magnetron worked. It contains snippets from DJI's video from Cine Gear 2016.

So there it is. However, I'm still looking for an official name. So far, Sean Bagley had the best idea; name it by the weight it can hold. Since it holds 2880 ounces and is an absurdly large number for a first model, it is named the Magnetron 2880. Email me if you have a better idea for the name.

The look of the Dog Schidt Optiks Trump Lenses by Bennett Cerf

Dog Schidt Optiks is a company from England, helmed by a DP named Richard Gale, which has begun to corner a niche in the lens market that has long been inhabited by the amateur and the curious photographer. They've taken old Russian lenses, opened them up and rebuilt them in a cinema friendly housing. That, in itself, is fantastic if you're into the old school dirty, creamy, flary feel of vintage lenses. They've gone one step further however and added an enormous amount of flexibility and options to them. You can change the rear elements from the classic to a modern Multicoated, Uncoated and an Ultra Low Contrast one which Richard calls the "Special Sauce". I see the latter one like Samuel Jackson in Pulp Fiction see's the AK47.  If you're interested in learning more about the company, News Shooter did a great article about Dog Schidt Optiks last year. It's worth a read.

So why am I writing about these lenses?

These lenses are like an analogue dream come true in a digital universe. They really are so organic and flexible. However, there was a PROBLEM-- No one appeared to have put up a test that shows all these amazing options in one place. This is where my friend Phil Abatecola from Distant Signal comes in. He just bought the lenses recently with a daunting variety of inserts and rear elements. So we decided to test them out and share them. All the tests were done on my Sony FS7 with my friends Ihui from Polartropica and Yoko Okumura.

Who wants to know?

I think this test is for director's and DP's who really are looking for new visual ideas. Although this set doesn't include a wide prime like a 24mm or wider, I still think you can get amazingly diverse looks for cheap. Below, I've compared some of the Trump looks with movies that were shot with lenses that have the same effects.

What does it all mean when you're trying to tell a story?

Below is a real world attempt by Domenic Barbero to get an anamorphic affect with these lenses using the anamorphic waterhouse stops and a 4mm streak filter. I think with all the backlighting and sunset lighting, these images really have a nostalgic and otherworldly effect. The flares add a layer that guides your eye as another layer of texture. I think images with textures have a different kind of seductive quality than the clean, ultrasharp modern lens look that we've become used to. The softer effects really tap into something deeply subconcious in my opinion.

I'm offering 3 different ways to look at these tests:

--The Long Version with all the tests

--Bite Sized Versions of most of the tests

--A PDF with stills and explanations of the lens and camera settings

The Long Version

Phil Abatecola has also put up the Test video on Youtube. Check it out if you're having any trouble with my site. Youtube Trump38 & 58 Test

Individual Clips

Results for the Custom Inserts below 

PDF

Click on the image below for the PDF. It will give you a good idea of what these lenses can do at a glance. If you want an uncompressed version, you can email me and I'll hook you up as soon as I can. bennettcerf@gmail.com

The Making of Last Meal by Bennett Cerf

Last meal was a short film I shot with my longtime collaborator, Yoko Okumura. Yoko and I graduated from the American Film Institute in 2014 and as of today, we've probably worked on nearly 20 projects together. The idea came about when Yoko had been going through her idea journal and she had recalled seeing an article about overpopulation in Guatemalan prisons. We looked up the article and found an exposé written by Giles Clarke written for Vice Magazine.  Giles' description of the living conditions in the prisons are horrifying. One of the remarkable features of this prison is that they stuff 35 men to 12 x 18 cages. It's hard to imagine living like this for any time longer than an hour. There's nowhere to go to the bathroom, there's nowhere to wash cloths and there isn't much protecting them from the elements or each other.

The above images that Giles captured struck me and I decided to portray this scenario in a story about compassion. Yoko and I enlisted two of our friends—Haisu Wang and Caroline Post to do production design for us and we all began to search for references to inspire ourselves. These references fed directly into our storyboarding process as you'll see later in this post.

Video Storyboards

One thing I've been a fan of in the past is video storyboarding. This is something that I did extensively before I went to AFI, but I really embraced it during AFI as well. Most of my projects now don't allow enough time to shoot video storyboards, but I miss them. They can be a very clarifying part of the preproduction process. I feel that any director working with a DP that is new to them would get a lot out of it. It's like speed dating before your first date. You get a chance to see how each personality deals with trying to tell the story and prepares your mind for what you will have to do by the time you arrive and the crew is waiting.

From References to Execution

Below, I've put together a side by side comparison of where we started and where we finished. The first column is a reference that I thought would make sense in the story. The second column is images from the video storyboarding process and 3D's that I made in Google Sketchup. The third column is the final execution of the project.

Scouting, Sketchup and set Design

What I've done in the past is create the entire set in Sketchup nearly inch by inch during a scout. Sometimes this would take some patience on the part of the rest of the team, but I found that I could explore our locations virtually to find shots and interesting juxtapositions with the director later without having to take up the time of the producer or the location. Often, the people who own or manage a location don't want to sit around while the director and I are talking shots and set design. For this project, we had a few challenges—we needed a giant cage that was light enough to travel with, a giant wall to help us cheat the interior space and another wall to cheat the connection between the two spaces.

The Scout at Studios 60 turned out to be a random discovery. I had shot a bunch of AFI projects at their location in South LA and when our search for a prison location left us empty handed, we thought of maybe using Studios 60. However, the only location there that looked like it was appropriate was a warehouse full of carpets and rugs. When we had walked in, I remembered there was a giant bolt fabrication factory to the East and asked if we could look there. It turned out that Studios 60 owned that property as well! We took a look and realized that it was perfect! Long shelves of metal everywhere, rust and oily floors, it was exactly what I had imagined. 

The next step of the process was setting up the logistics of where everyone would be during the shoot. I like to use Google Earth Pro to virtually scout locations before and after I've actually visited them. You can measure distances with nearly 1 foot accuracy and in some cases fly around a pretty good 3D of an outdoor space. I've noticed thin objects like phone poles don't translate well, but I think the advantage of seeing your location from a bird's eye view instantly is pretty amazing! I use Google Earth for scouting aerial projects as well when a proper scout isn't possible. For this project, we wanted a dirty industrial yard to help us with the textures. After looking through the location, we decided to put our first scenes inside the warehouse to the north and then put the cage in the enclosed nook to the South.

The final part of the process was designing the cage and arranging the space to fit the locations. I had originally built an entire set virtually, but when we finally found a location, I remade them in Sketchup. I had made a crude cage as well, but when we looked into transporting the cage, Haisu designed an accurate one in Sketchup and I began to use his in my models. In the end, we had a pretty accurate idea of what we wanted and that made it easier to shoot our storyboards.

All in all, I don't think it's possible to overthink a project. I think I went pretty far to ensure that I knew what I had to do to finish this project efficiently and while communicating with everyone on the team so all surprises on the shoot day would be pretty small. In the end, there were few surprises. I think it was the most fun I've had shooting a project. Here is the final product.